

1. First log into your Cisco HyperFlex Connect.
2. Once you have logged in, you will see your Dashboard and can check to make sure the cluster is healthy.

3. Once you have verified your cluster is healthy, click on the Datastores tab under the MANAGE section on the left hand side.

4. Now that you are in the Datastore section, you can click on Create Datastore in the top left corner of the Datastore section.

5. After you click this, a pop-up box will come up and you can type in the information for your datastore you wish to create.
o Datastore Name: You can name your datastore whatever you wish. This will be the name that shows up here, and in your vCenter, or other virtual manager device.
o Size: Also simple, you can choose the size of your datastore. This is going to be based on your requirements and available storage.
o Block Size: Have not had to mess with this, and I will provide more information once I read more into this. I keep default for now.
o Create Datastore: Click here to complete and finish your datastore.

6. You should see your datastore show up in the HyperFlex Connect datastore list.

7. Also, you can head over to vSphere and check the datastores in there to verify it also shows up there.
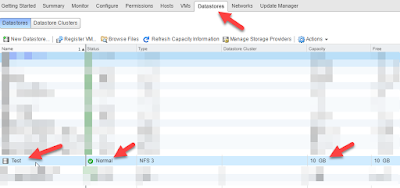
8. You are finished and can now start adding systems and data to the datastore.
2. Once you have logged in, you will see your Dashboard and can check to make sure the cluster is healthy.

3. Once you have verified your cluster is healthy, click on the Datastores tab under the MANAGE section on the left hand side.

4. Now that you are in the Datastore section, you can click on Create Datastore in the top left corner of the Datastore section.

5. After you click this, a pop-up box will come up and you can type in the information for your datastore you wish to create.
o Datastore Name: You can name your datastore whatever you wish. This will be the name that shows up here, and in your vCenter, or other virtual manager device.
o Size: Also simple, you can choose the size of your datastore. This is going to be based on your requirements and available storage.
o Block Size: Have not had to mess with this, and I will provide more information once I read more into this. I keep default for now.
o Create Datastore: Click here to complete and finish your datastore.

6. You should see your datastore show up in the HyperFlex Connect datastore list.

7. Also, you can head over to vSphere and check the datastores in there to verify it also shows up there.

8. You are finished and can now start adding systems and data to the datastore.


