

1. From Server Manager, select DHCP from the Tools menu icon in the top right of the Server Manager screen.

2. Expand your domain you wish to add scopes to. Once it is expanded, then expand the IPv4 section.
3. Once expanded, identify and make sure your scope will not conflict with another. Once you have verified the scopes, right click on the IPv4 server icon and select New Scope.

4. On the pop-up, select next to continue with the scope creation.

5. Next, you can type in the name of your scope, and then a good description of what the scope is for.

6. On the next screen, type in your network range, we will use an 8.8.8.0 network for our testing. Type in the start of the network range, to the end of the network range you wish to work on. Next, put in your subnet masking for the network range.

7. The next screen you put in your address you do not want the DHCP scope range to give out. Say you have 20-30 servers on your network and you want to manually assign/reserve addresses for these, you can block out a range of IPs this way. Like in the below example, IPs 1-50, and 200-254, will not be issued out.

8. The next screen is your DHCP lease duration. This only means systems utilizing DHCP will only have that DHCP IP lease for this duration. The IP addresses given out in this scope will expire after 8 hours. After the 8 hour mark, systems will request a new lease time for this one, or request another IP address altogether. This will require some tweaking and does depend on the needs of your systems.

9. The next screen you can select if you want to go ahead and configure basic options for the scopes. This includes default gateways, DNS servers, and WINS settings. We will select yes here.

10. Next, is the Router address, or Default Gateway for the scope to go out of to talk to other networks. You can list multiple ones, or just one. List whatever your systems require. Click on add to add each one to the list, and then click Next to continue.

11. On the next screen, you will put in your DNS settings. You can type in your domain, and also the DNS servers you want to be issued to the scope. Click next once you are done.

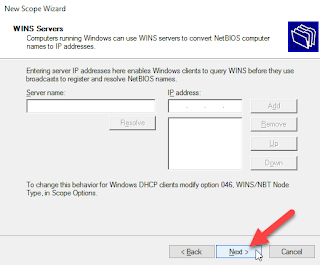
12. Next, if you have WINS servers for converting NetBIOS names to IP addresses, you can list them here. For this test scope, we will not set this up, so just click next.
13. Finally, you can choose whether to activate the scope now or keep it deactivated temporarily for an ASI window or when you are ready to move the relays/IP helpers in your Cisco/switching equipment.

14. Finally, verify if the scope shows up in your IPv4 scopes. You can right click to activate and deactivate freely too if you are waiting activation.


2. Expand your domain you wish to add scopes to. Once it is expanded, then expand the IPv4 section.
3. Once expanded, identify and make sure your scope will not conflict with another. Once you have verified the scopes, right click on the IPv4 server icon and select New Scope.

4. On the pop-up, select next to continue with the scope creation.

5. Next, you can type in the name of your scope, and then a good description of what the scope is for.

6. On the next screen, type in your network range, we will use an 8.8.8.0 network for our testing. Type in the start of the network range, to the end of the network range you wish to work on. Next, put in your subnet masking for the network range.

7. The next screen you put in your address you do not want the DHCP scope range to give out. Say you have 20-30 servers on your network and you want to manually assign/reserve addresses for these, you can block out a range of IPs this way. Like in the below example, IPs 1-50, and 200-254, will not be issued out.

8. The next screen is your DHCP lease duration. This only means systems utilizing DHCP will only have that DHCP IP lease for this duration. The IP addresses given out in this scope will expire after 8 hours. After the 8 hour mark, systems will request a new lease time for this one, or request another IP address altogether. This will require some tweaking and does depend on the needs of your systems.

9. The next screen you can select if you want to go ahead and configure basic options for the scopes. This includes default gateways, DNS servers, and WINS settings. We will select yes here.

10. Next, is the Router address, or Default Gateway for the scope to go out of to talk to other networks. You can list multiple ones, or just one. List whatever your systems require. Click on add to add each one to the list, and then click Next to continue.

11. On the next screen, you will put in your DNS settings. You can type in your domain, and also the DNS servers you want to be issued to the scope. Click next once you are done.

12. Next, if you have WINS servers for converting NetBIOS names to IP addresses, you can list them here. For this test scope, we will not set this up, so just click next.

13. Finally, you can choose whether to activate the scope now or keep it deactivated temporarily for an ASI window or when you are ready to move the relays/IP helpers in your Cisco/switching equipment.

14. Finally, verify if the scope shows up in your IPv4 scopes. You can right click to activate and deactivate freely too if you are waiting activation.


